DAWN WILLIAMS BOYD
MAKING A CLOTH PAINTING
Many of you, particularly the artists among you, often ask about my process in creating my cloth paintings. I've promised to lay out the step while I'm updating this site. While creating my latest series, Dawn Williams Boyd: FEAR, I've consciously taken the time to document photographically the myriad steps. The team at Fort Gansevoort, New York, also like to have periodic updates on my progress, especially during the creation of this last set of cloth paintings which took three years to complete. In addition, in 2024, my younger daughter Iyabo K. Boyd, a filmmaker based in the Bronx, NY was inspired to make a documentary film about my work, so STAY TUNED for that in 2026!
STEP 1: HAVE SOMETHING TO SAY
This is both the easiest and the hardest step. What is the purpose of your artwork? The arts are vehicles for communication! What do you want to communicate - something about yourself, your community, politics, the environment, a beautiful thought or feeling?
STEP TWO: TRANSITION FROM THOUGHT TO SUBSTANCE
Step one applies to ALL the arts, but since I am a VISUAL artist, my next step is figuring out how to translate what is in my head to a visual format that YOU can see. For years I kept a sketch book where I jotted down ideas for future work, but several years ago I lost it! As you can imagine it was devastating! Since then, I send myself emails with ART IDEAS that include specifics like size, shape, colors, special fabrics or surface additions (beads, sequins, lace, cowrie shells, etc.) that I'm going to need or surface design elements that I want to employ.
Before I write anymore, and keeping in mind the old adage about "a picture being worth 1000 words " here is a peak into what my working environment looks like - my studio circa 2022-2024 and circa 2025-2026. Another old adage says that "a messy space indicates an organized mind", so don't judge me! There is no point in straightening out my studio until I'm done working in it!


2010 - 2024

2025 - 2026
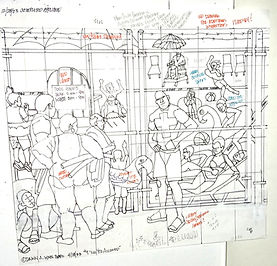
STEP THREE: SMALL COMPOSITIONAL SKETCHES
Once I've decided what I want to say and the approximate size, in order to produce a very detailed cloth painting I need to begin with a very detailed drawing. This usually takes place in a drawing pad. The pads I'm using currently are 11 x 14 inches, acid free, mixed media paper. I'll add paper in order to achieve the correct shape if necessary. I draw in pencil to begin and eventually do a semi-final drawing in black ink. You'll see that these sketches have notes scribbled on them about eventual size, background, material and colors. I can draw whatever I can see, but since I don't have access to live models or a vast store of objects, I use images that I source online. If, for instance, I need an image of "a woman lying on her back", my online browser will give me hundreds of images which I cobble together for the effect I want. Here are examples of small sketches from the FEAR series.
©Dawn Williams Boyd 2025 (sketch) The Illusion of Freedom

©Dawn Williams Boyd 2025 (sketch) Cultural Appropriation
STEP FOUR: ENLARGE SKETCH TO ROUGH DRAFT SIZE VIA PROJECTOR.
Until a couple of years ago, this next step, blowing the small sketches up to the finished size, would best be described as painstaking and painful. I would draw a graph (an equidistant horizontal and vertical line pattern, if you are unfamiliar with term) on the small sketch an inch or less apart, then draw a graph on a large piece of craft paper in bigger sections that corresponded to the smaller dimensions. For instance, a 1 x 1 inch square on the small sketch would become a 4 x 4 inch square on the large sketch. EVERYTHING that was drawn inside the 1 x 1 inch square would need to be drawn to scale in the 4 x 4 inch square. Now keep in mind that on average, my cloth paintings are 48 x 72 inches and the largest pieces in the FEAR series are 59 x 116 inches (Desegregation Should Have Been Enough) and 74 x 106 inches (They Marched, They Rode Buses, They Sat In). That method could, literally, take weeks!
I finally wised up a few years ago and purchased a small projector which, once set up, reduces the actual time to about 45 minutes per piece depending on size. The only negatives are having to have the drawing scanned to a zip drive at my local print shop and finding a room in my home that is long enough to blow the drawing up to the correct size. I have had to reduce an idea to a smaller scale because there wasn't enough room.
Here is what the blown-up rough drafts look like:

©Dawn Williams Boyd 2025 (sketch) The Illusion of Freedom
STEP FIVE: FINE TUNE LARGE ROUGH DRAFT
You will notice the many photocopies I mentioned earlier that were downloaded from the internet sources taped to the surface of this rough draft. If you take a closer look at the drawing you'll notice that they are rough - bubble heads and mitts for fingers on the figures. This step is where those shapes are refined into human faces and fingers; clothing, hair styles and background details are added; people are occasionally added or deleted in this step. This is done in pencil and once it is almost perfect it is redrawn in a black ink marker. While we are here, please notice that each figure or background item, each chair, towel or inner tube comprises a SHAPE. We'll come back to that in Step 7.
STEP SIX: TRACE REAL SIZED DRAWING ONTO BASE LAYER SHEET
This time let me show you the photo first.


STEP SIX: TRACE REAL SIZED DRAWING ONTO BASE LAYER SHEET, Continued
Depending on the size of my piece I'm either working on my drawing wall (left two images) or my piecing tabletop (right two images). In both instances a base layer sheet (usually literally a bedsheet, though occasionally a tablecloth or other discarded piece of fabric sourced from the Goodwill, etc) is stapled to the wall or taped to the table. It is covered by a layer of carbon tracing paper, which I was thrilled to discover can be had in colors! The scaled up drawing is layered over this and using a tracing wheel the entire drawing is traced onto the base layer fabric.
Are you keeping count of how many times I've drawn this image?
STEP SEVEN: TRACE EACH INDIVIDUAL SHAPE ONTO TRACING PAPER
Once the entire drawing is traced onto the base sheet, the carbon paper is removed, and each individual SHAPE is then traced onto sheer tracing paper using a black ink marker. There are usually hundreds of shapes. Think of pieces of a giant jigsaw puzzle! My tracing paper comes in 36 inch wide by 10-yard-long rolls. The most economical way to achieve this is to trace as many shapes on one large piece of tracing paper as possible. Depending on the number of figures, the complexity of the background and the size of the piece there may be several large tracing paper sheets. In order to keep track of which shapes go where each shape is lettered A-Z to correspond with a figure, chair or background piece and numbered to correspond with the sections of each figure - for example shape A1 might be figure A's face or hair. Shape A23 might be figure A's left foot or toes. Then ALL of each figure or background piece is cut out of the tracing paper and stacked together. Then ALL of the shapes for the entire drawing are placed together in a plastic grocery bag, labeled and set aside.

©Dawn Williams Boyd: FEAR Cultural Appropriation

©Dawn Williams Boyd: FEAR Abduction
STEP EIGHT: FABRIC AND THREAD SELECTION
Throughout the preceding steps, fabric selection has been in the back of my mind. As early as Step Two I've had a pretty good idea of what I want the colors to be generally, but now its time to determine what fabrics I already have or whether I need to source more. My current home page gives you a glimpse of my 'stash' of fabrics and how it is organized. At this step I pull ALL the colors and patterns I MIGHT want to use. Final decisions will be made during the APPLIQUE steps.

STEP NINE: TRACE EACH SHAPE ONTO FABRIC
Once a specific set of fabrics has been chosen for each piece, the shape is traced onto the fabric using as light a color of carbon tracing paper as possible. Unlike seamstress tracing paper this carbon paper will not fade or rub off over time, so care must be taken to use it precisely. Some shapes are so small or so intricately formed that the entire shape needs to be cut out and zigzagged to the surface versus the fold over method that can be used with larger shapes. In that case an adhesive product called Wonder Under is used. This product requires me to trace the shape backwards and iron the Wonder Under to the reverse of the fabric. I won't tell you how many times I've messed up one of those steps and had to start over!!!


STEP 10: PUSHING PINS - APPLIQUE FABRIC PIECES TO BASE LAYER WITH STRAIGHT OR ZIGZAG STITCHES
Once all the hundreds of pieces have been cut from fabric, its finally time to put all the puzzle pieces together. I've lost count of how many times I have drawn the image so far but at least one more drawing is necessary, this time using a sewing machine needle as my stylus and the thread as my ink. In applique, you lay the pieces in place pushing in a LOT of straight pins in order to hold the fabric in place and sew them down using either a fold over method and a straight stitch, or, where I've cut out an intricate shape with Wonder Under, sewing it down with a zigzag stitch. Then I remove the pins one by one as the sew machine needle approaches - Heaven forbid I should strike a steel straight pin with my steel needle! A potential time-consuming disaster in the making!!! Now let me give you a good piece of advice here. As I mentioned earlier Wonder Under is an adhesive product that technically allows you to just iron the fabric in place but believe when I tell you that sewing it down is the only thing that will keep it from coming off eventually.

©Dawn Williams Boyd: FEAR Desegregation Should Have Been
Enough


©Dawn Williams Boyd: FEAR Abducted
STEP ELEVEN: EMBROIDERY and SURFACE DESIGN
One of the things that makes my cloth paintings different from other artists who work in a similar fashion is the hand embroidery and embellishments that grace the surface of my work. I use cotton embroidery floss for the facial expressions of the human (and animal) figures. Pictured below is the progression of the embroidery of a group of faces and a sneak peek at what the back looks like. I also sew on beads, sequins, cowrie shells, buttons, etc. in this step. My embroidery studio features a comfortable chair, a foot stool and a television where I usually watch old movies. I think these additions which enhance the surface layer make my work a must see in person! You just can't see them in a photos!


©Dawn Williams Boyd 2025 - FEAR: Terrorism

STEP TWELVE: TRIM, SIGN, APPLY HANGING TUBE AND LABEL
This point always makes me feel as though I'm almost done, but there are several critical steps that MUST be completed before the cloth paintings leave the studio. The piece has to be signed and dated in embroidery floss from the back of the surface layer. A backing layer, large pieces of fabric chosen specifically for this task, must be cut to size. Around the entire circumference of the piece the edges of the backing layer and the surface layer must be folded inward, pinned and stitched in such a way that the backing layer cannot be seen from the front. A cloth tube must be made and sewn to the upper back. A wooden lattice has to be made that fits into that tube precisely so that the artwork can be nailed/screwed to a wall in such a way that it lays/hangs flat. I depend on my talented Husband, Irvin Wheeler, for the wood work. Finally an identification label must be made and sewn to the back of the piece.


STEP THIRTEEN: CLEANING, PHOTOGRAPH, PACK AND SHIP TO GALLERY
FINALLY, we are actually almost done! I know this has been exhausting so Ill make this as short and simple as possible.
- Clean with giant lint rollers. This not only removes lint and cat hair, it lift pieces of thread that still need to be snipped off.
- Have the cloth paintings professionally photographed. I always especially enjoy this step because it is the first time I get to see the work vertical and at a distance!
- I layer thin sheets of bubble wrap between two or three cloth paintings, roll them around Styrofoam pool noodles and cover them in black contractor plastic bags with lots of tape to seal them against water.
- I use oversized telescoping corrugated cardboard boxes because it essentially makes a double walled box versus the actual double walled boxes which cost twice as much.
- I affix a shipping label and wait for the shipping guy to come pick them up. The last photo here was taken at 3:00AM!
WOW!!! This was almost as exhausting as actually making a cloth painting. To those of you still reading BRAVO for sticking with me! If you have a question I didn't answer, go to the contact page and send me a note. Thanks for your patience!
For inquires please contact Fort Gansevoort Gallery at: gallery@fortgansevoort.com